Pikachu – Free Crochet Pattern

I’m really flying through the pencils for Small Shen… I’m already near the end of Chapter 8. After that, it’s only Chapter 9 and the prologue, which is about 20 pages. After inking and toning, that’ll be the end of July, which is just in time for a Xmas release. WOW!

Then, what’s up next is… this.


pokemon
 

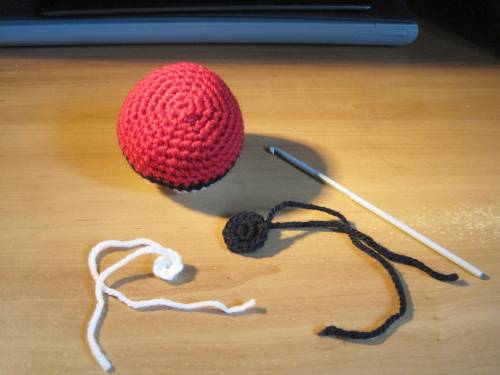
Anyway, this week, I get to do a pokemon crochet… of which many people have asked for. Previously, I thought Pikachu may have been too complicated to do, but it seems not. This wasn’t that much harder than some of the other crochets I’ve done. Either way, here’s Pikachu!!


Pikachu
 

Pikachu Pattern

Here’s a list of what I used to make this crochet. It’s not a definite list, so feel free to use whatever you have, as long as it’s appropriate. It’s crocheted in the round, like most amigurumi, so only basic crochet skills are required.

NB. This pattern is created by me, so please give a link back to me if you want to use it or if you want to sell your crochet. Please give credit where it’s due. I should also that I don’t own the copyright to these characters – obviously Studio Ghibli does.

  • Yellow, black, red and brown 8 ply yarn
  • 4mm crochet hook
  • Two pairs of 8mm black safety eyes – 6060 from Etsy is a good place to buy these
  • Large sewing needle, to sew the bits and pieces together


Crochet Abbreviations

Here are a list of the abbreviations I use, and what they mean. These are pretty standard, so if you know how to crochet, this won’t be hard to decipher:

  • ch – chain
  • sc – single chain
  • dec – decrease
  • * – beginning/end of a repeating part of the pattern


pikachu2
 

Pikachu Body (Make 1, yellow)

Rnd 1 – Ch 2, 6 sc in 2nd chain away from hook (Magic Ring method)
Rnd 2 – *2 sc in next stitch*, repeat 6 times (12 stitches)
Rnd 3 – *2 sc in next stitch, sc 1*, repeat 6 times (18 stitches)
Rnd 4 – *2 sc in next stitch, sc 2*, repeat 6 times (24 stitches)
Rnd 5 – *2 sc in next stitch, sc 3*, repeat 3 times (30 stitches)
Rnd 6 – 8 – sc (30 stitches)
Rnd 9 – *2 sc in next stitch, sc 4*, repeat 3 times (36 stitches)
Rnd 10 – sc (36 stitches)
Rnd 11 – *dec 1 in back loops ONLY*, repeat 18 times (18 stitches)
Rnd 12 – *2 sc in next stitch, sc 2*, repeat 6 times (24 stitches)
Rnd 13 – sc (24 stiches)
Rnd 14 – *2 sc in next stitch, sc 3*, repeat 3 times (30 stitches)
Rnd 15-22 – sc (30 stitches)

Stuff the body now, and add 8mm safety eyes
Rnd 23 – *dec 1 in back loops ONLY*, repeat 15 times (15 stitches)
Rnd 24 – *dec 1*, repeat 8 times (8 stitches)

Bind off, and then sew the facial features onto Pikachu with black and red wool.


pikachu3
 

Pikachu Feet (Make 2, yellow)

Rnd 1 – Ch 2, 6 sc in 2nd chain away from hook (Magic Ring method)
Rnd 2 – *2 sc in next stitch*, repeat 6 times (12 stitches)
Rnd 3 – *2 sc in next stitch, sc 1*, repeat 6 times (18 stitches)
Rnd 4 – *2 sc in next stitch, sc 2*, repeat 6 times (24 stitches)

Fold each foot in half, and sew them together to make a semi-circle. Sew onto the bottom of the body to make the feet.


pikachu4
 

Pikachu Ears (Make 2, yellow, black)

Using black
Rnd 1 – Ch 2, 4 sc in 2nd chain away from hook (Magic Ring method)
Rnd 2 – *2 sc in next stitch, sc 1*, repeat 2 times (6 stitches)
Rnd 3 – *2 sc in next stitch, sc 1*, repeat 2 times (8 stitches)

Change to yellow
Rnd 4 – 10 – sc (8 stitches)

Bind off, stuff lightly, then sew onto the top of Pikachu’s head to make the ears.


pikachu5
 

Pikachu Hands (Make 2, yellow)

Rnd 1 – Ch 2, 6 sc in 2nd chain away from hook (Magic Ring method)
Rnd 2 – *2 sc in next stitch, sc 1*, repeat 3 times (9 stitches)
Rnd 3-7 – sc (9 stitches)

Bind off, stuff lightly, then sew onto the sides of Pikachu to make the arms.


pikachu6
 

Brown Strip on Back (Make 1, brown)

Rnd 1 – Ch 8 (8 stitches)
Rnd 2 – sc (8 stitches)

Bind off, then sew onto the back of Pikachu.


pikachu7
 

Pikachu Tail (Make 1, yellow, brown)

Rnd 1 – Ch 9 (8 stitches)
Rnd 2-4 – sc 8, then sc an additional 4 chains off the end of Rnd 4 (8 stitches)
Rnd 5 – sc 8 stitches (8 stitches)
Rnd 6-8 8 sc, then switch to brown. Then sc an additional 4 chains off the end of the last row (8 stitches)
Rnd 9 – sc 8 stitches (8 stitches)
Rnd 10-12 – sc

Bind off, then sew onto the bottom back of Pikachu to make the tail.

 
And Viola! You have a Pikachu to fit into the palm of your hand!
 

Felt Cookies

This week I finished toning chapter 4 of Small Shen, so the book is officially two-thirds done! I’m taking a few days off, before I get to work on the last third of the book. In other news, a few weeks ago, I did an interview with IGotSuperpowers.com at Adelaide Comic-Con, and it’s now up online, thanks to Nathan.

This week I get to show you… felted cookie magnets. It’s from a kit I bought from a Japanese shopping site, and there’s 4 separate kits in the series. I bought them all, but can’t say there’s a lot of variation between the different cookies. They’re magnets though, so if you’re looking for stuff to stick to your fridge…


cookies1

Step 1: The boxes. Aren't they cute? Great packaging!


cookies2

Step 2: Open everything up, and check that it's there. Usually it is.


cookies3

Step 3: None of these are particularly complicated to sew, but here they all are, all at once!


Here’s the final 12 cookie-magnets:

 
cookies

Pokeball

I’ve finally finished chapter 3 inks, and will be starting chapter 4 inks soon. Don’t forget that I’ll be going to Adelaide Comic-Con this weekend, and that House of Odd came out last Tuesday!

This week I show you one of the first things I crocheted, since it was so easy. It’s a pokeball, and I got the free pattern from Wolfdreamer’s blog. This particular pattern makes a rather large ball (the size of your first) at 42 stitches, so for my version I decided to shrink it down to 30 stitches. I found that 30 stitches maximum produced a pokeball that is more like the size it’s supposed to be (ie. fits into the cup of your hands).


pokeball1

Step 1: Crochet the top half of the pokeball. I stopped at 30 stitches though, since I felt that was the "normal" size for a pokeball.


pokeball2

Step 2: Add the black parts then the white parts. You do this much in the same you chance colours during crocheting.


pokeball

Step 3: Crochet the little black and white buttons in the middle of the pokeball, then sew them onto the ball.


And here we have two pokeballs, one 42 stitches wide, and one 30 stitches wide. You can see the size difference.

 
pokeball

Grey Totoro – Free Crochet Pattern

Hi folks. This week my laptop is in the repair shop, so I’m sitting at a borrowed laptop while trying to plug the latest music single release from my friend Yunyu. It’s Dorothy (I wrote about the teaser trailer here), the first single from her Twisted Tales album, which is a music-manga collaboration between Yunyu and myself.

The official release date for Dorothy is 2nd March, 2012, but pop-culture sites Madman Entertainment, CoolShite and ToneDeaf has had an exclusive, early look at the full music video. You can click on the links I just wrote up, or you can wait until next Friday, when I do my full post on this project.

This week, as promised, I give you the grey Totoro pattern I had from 2 weeks ago. I have the blue and white Totoro patterns here, and given the way this is going, I guess I’ll have to create a new page for “free patterns” very soon.

 
All Totoro head


Grey Totoro Pattern

Here’s a list of what I used to make this crochet. It’s not a definite list, so feel free to use whatever you have, as long as it’s appropriate. It’s crocheted in the round, like most amigurumi, so only basic crochet skills are required.

NB. This pattern is created by me, so please give a link back to me if you want to use it or if you want to sell your crochet. Please give credit where it’s due. I should also that I don’t own the copyright to these characters – obviously Studio Ghibli does.

  • White, black and blue 8 ply yarn
  • 4mm crochet hook
  • Two pairs of 3mm black safety eyes – 6060 from Etsy is a good place to buy these
  • Large sewing needle, to sew the bits and pieces together


Crochet Abbreviations

Here are a list of the abbreviations I use, and what they mean. These are pretty standard, so if you know how to crochet, this won’t be hard to decipher:

  • ch – chain
  • sc – single chain
  • dec – decrease
  • * – beginning/end of a repeating part of the pattern


greytotoro1
 

Grey Totoro Body (Make 1, grey)

Rnd 1 – Ch 2, 6 sc in 2nd chain away from hook (Magic Ring method)
Rnd 2 – *2 sc in next stitch*, repeat 6 times (12 stitches)
Rnd 3 – *2 sc in next stitch, sc 1*, repeat 6 times (18 stitches)
Rnd 4 – *2 sc in next stitch, sc 2*, repeat 6 times (24 stitches)
Rnd 5 – *2 sc in next stitch, sc 3*, repeat 3 times (30 stitches)
Rnd 6 – 10 – sc (30 stitches)
Rnd 11 – *2 sc in next stitch, sc 6, 2 sc in next stitch, sc 7*, repeat 2 times (34 stitches)
Rnd 12 – sc (34 stitches)
Rnd 13 – *2 sc in next stitch, sc 8, 2 sc in next stitch, sc 7*, repeat 2 times (38 stitches)
Rnd 14 – 23 – sc (38 stitches)
Rnd 24 – *dec 1, sc3*, repeat 8 times (30 stitches)

Stuff the body now, and add 3 mm safety eyes
Rnd 25 – *dec 1 in back loops ONLY*, repeat 15 times (15 stitches)
Rnd 26 – *dec 1*, repeat 8 times (6 stitches)

Bind off, and thread the yarn through the top of the Totoro (if you can), so you can flatten the base. Using a sewing needle, sew a few white yarn stitches around the safety eyes. Then using black yarn, sew the nose on in-between the eyes, then sew the dot mouth on.


greytotoro2
 

Grey Totoro Belly (Make 1, white)

Rnd 1 – Ch 2, 6 sc in 2nd chain away from hook (Magic Ring method)
Rnd 2 – *2 sc in next stitch*, repeat 6 times (12 stitches)
Rnd 3 – *2 sc in next stitch, sc 1*, repeat 6 times (18 stitches)
Rnd 4 – *2 sc in next stitch, sc 2*, repeat 6 times (24 stitches)
Rnd 5 – *2 sc in next stitch, sc 3*, repeat 6 times (30 stitches)
Rnd 6 – *2 sc in next stitch, sc 4*, repeat 6 times (36 stitches)

Bind off, and sew the white belly onto the bottom front of the Totoro. Using blue yarn, sew seven “arrows” on its chest.


greytotoro3
 

Grey Totoro Ears (Make 2, grey)

Rnd 1 – Ch 2, 4 sc in 2nd chain away from hook (Magic Ring method)
Rnd 2 – *2 sc in next stitch, sc 1*, repeat 2 times (6 stitches)
Rnd 3 – 6 – sc (6 stitches)

Bind off, and sew onto the top of the head.


greytotoro4
 

Grey Totoro Arms and Tail (Make 3, grey)

Rnd 1 – Ch 2, 6 sc in 2nd chain away from hook (Magic Ring method)
Rnd 2 – *2 sc in next stitch, sc 1*, repeat 3 times (9 stitches)
Rnd 3 – *2 sc in next stitch, sc 2*, repeat 3 times (12 stitches)
Rnd 4 – 7 – sc (12 stitches)
Rnd 8 – *dec 1, sc1*, repeat 4 times (8 stitches)

Bind off, and stuff lightly for the arms. For the tail, stuff heavily. Sew onto the sides and back of the body.


And here we have another 2 pics of the three Totoros!


alltotoro_walk
alltotoro_line